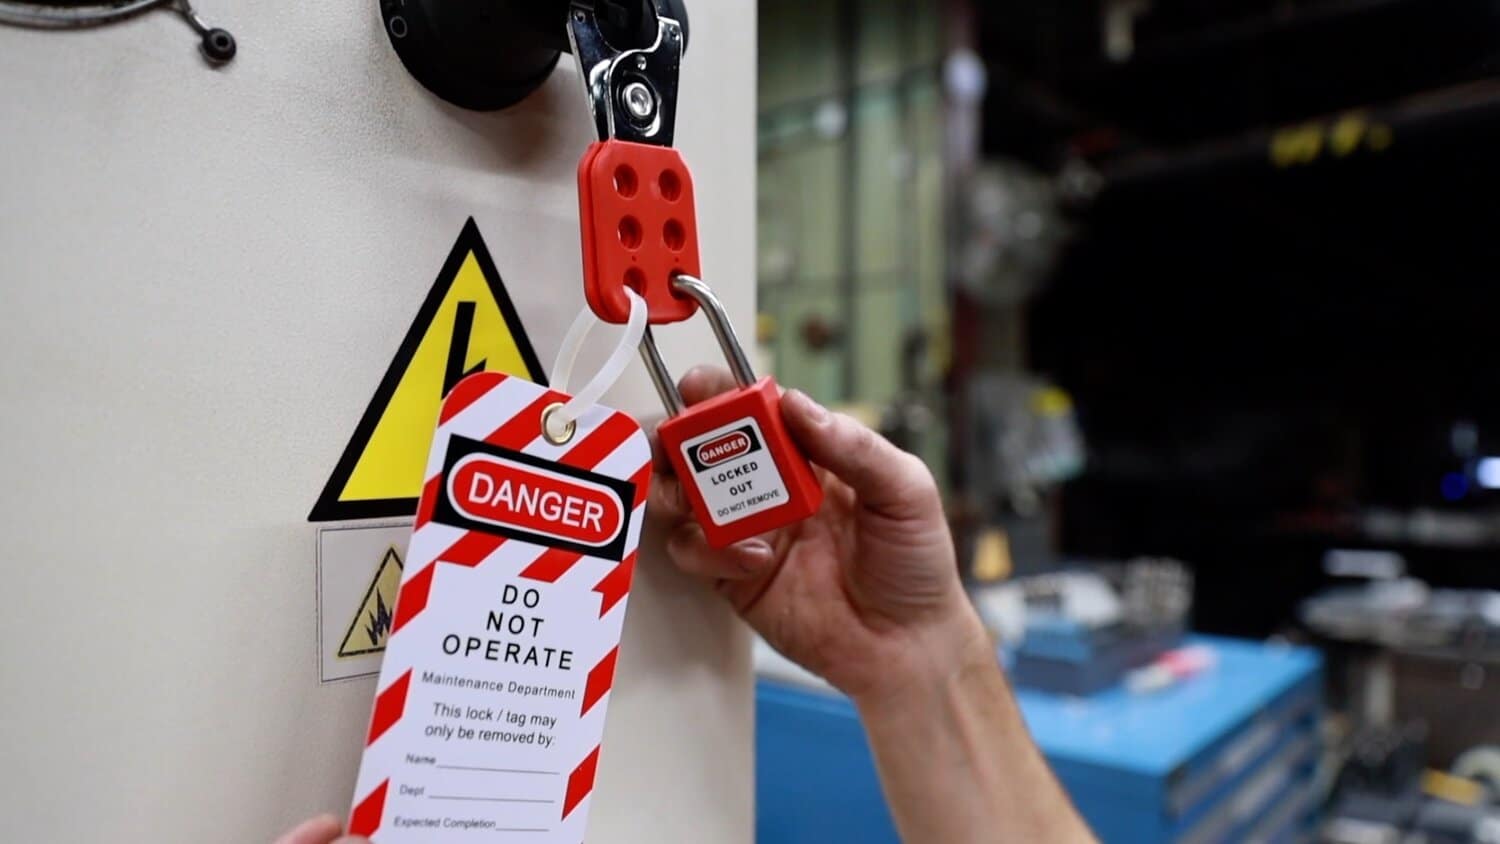
A machine is locked out. Maintenance is complete. Workers move to restart operations—only to find no formal record of who removed the locks or why. This gap isn’t just an oversight. It’s a compliance failure hiding in plain sight.
The lockout tagout removal form closes that gap. It documents the final, often overlooked phase of the LOTO process: the safe, authorized release of energy control measures. Without it, organizations risk accidental startups, equipment damage, and OSHA violations.
This article cuts through the confusion. You’ll learn what a LOTO removal form actually does, when it’s required, how to structure it effectively, and where common breakdowns occur in real industrial environments.
What Is a Lockout Tagout Removal Form?
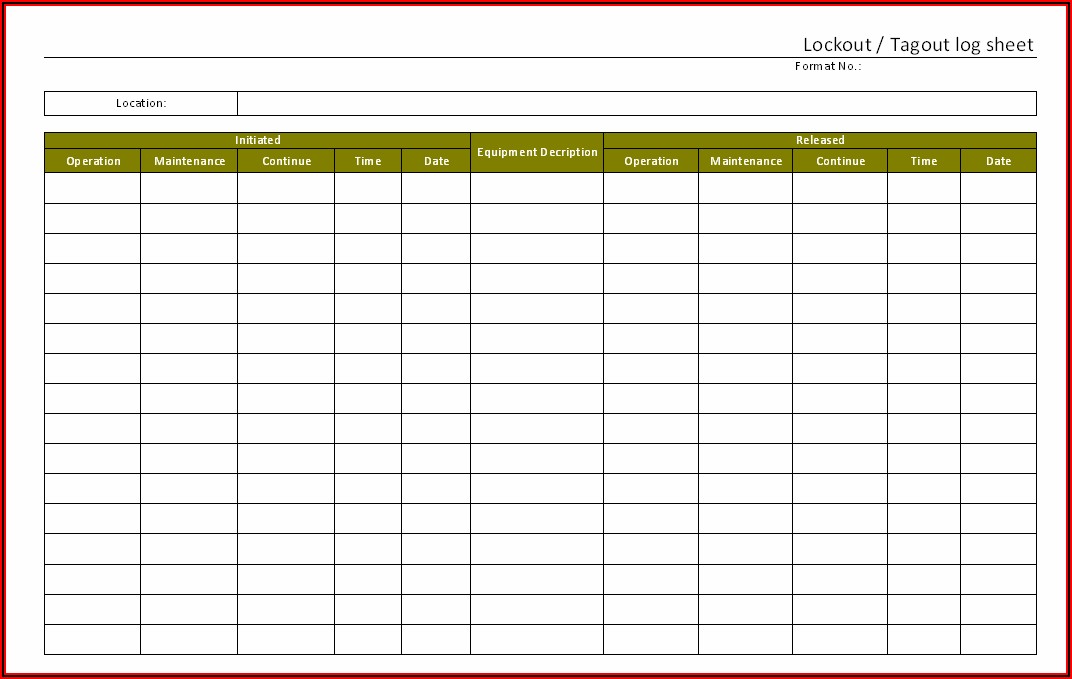
A lockout tagout removal form is a documented checklist or log used to verify and record the removal of lockout devices after servicing equipment. Unlike the initial lockout procedure—which focuses on isolating energy sources—the removal form confirms that maintenance is complete, all workers are clear, and it’s safe to re-energize the machine.
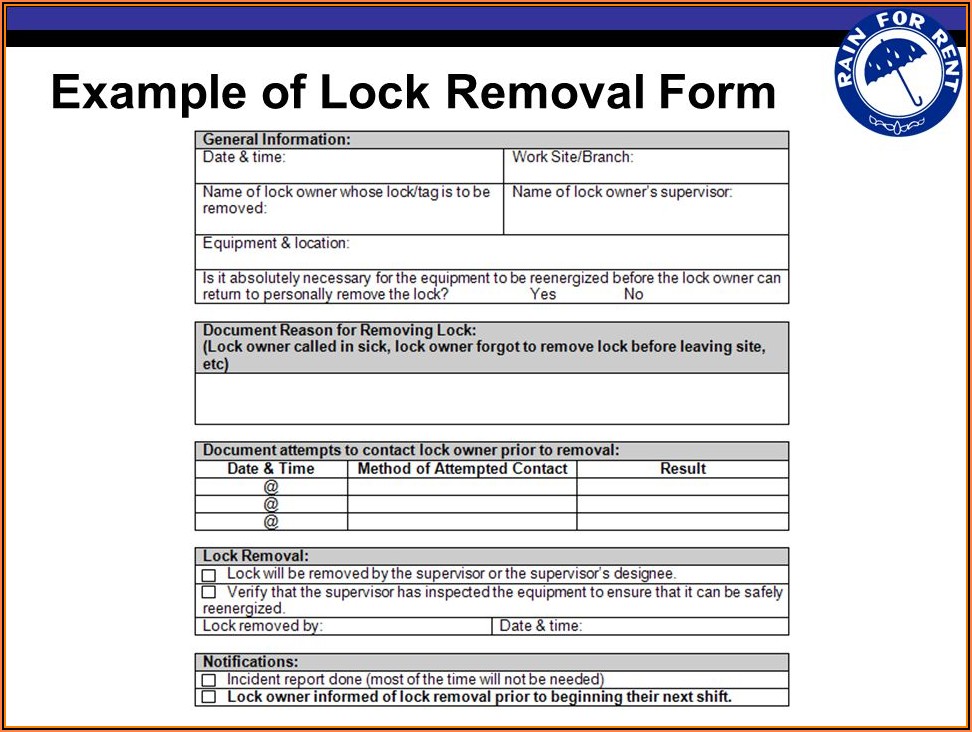
It’s not merely a signature sheet. A well-designed form includes: - Technician name and role - Equipment identification - Date and time of lock removal - Verification of tool clearance - Supervisor or lead authorization - Brief work summary
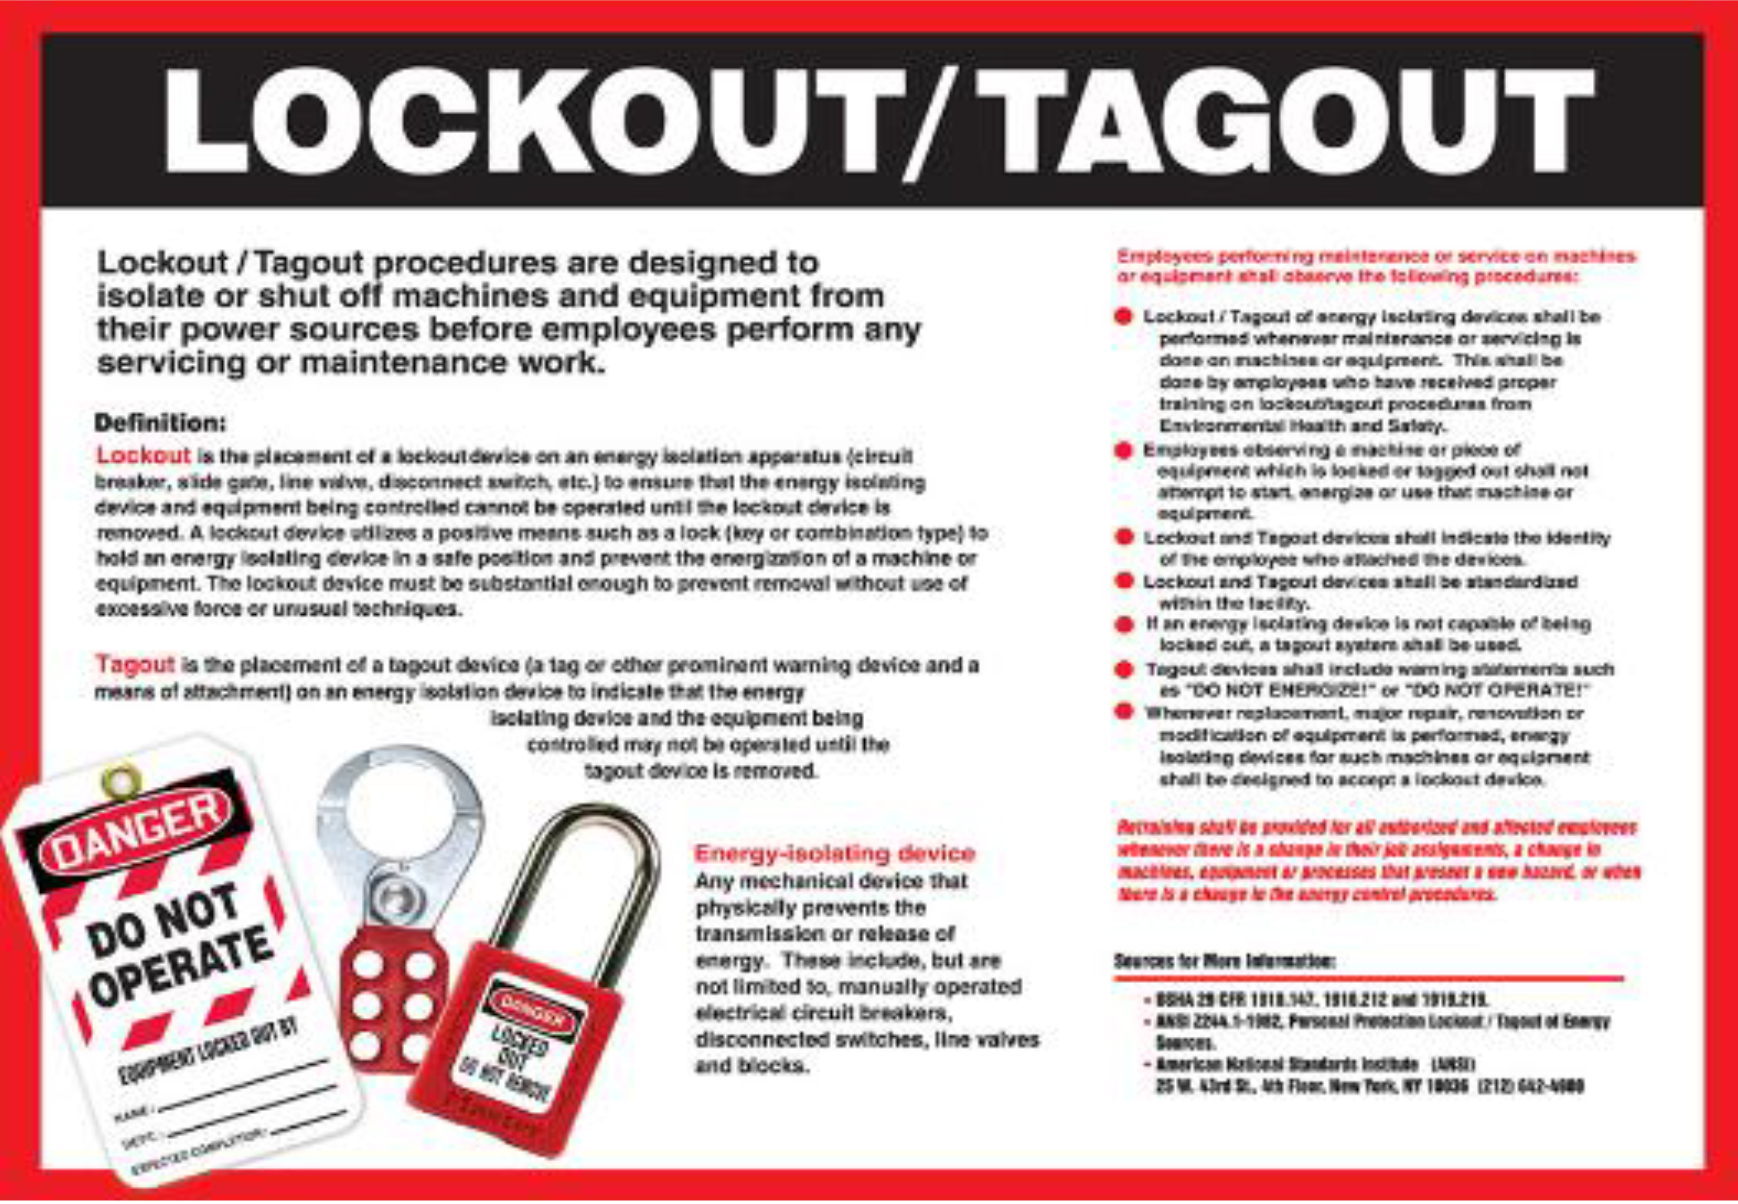
Think of it as the “debrief” of the LOTO cycle. While OSHA’s 29 CFR 1910.147 doesn’t explicitly mandate a removal form, it does require documented procedures for both application and removal of lockout devices. Organizations that skip formal documentation often fail audits or struggle during incident investigations.
Why Removal Documentation Matters Beyond Compliance
Compliance is the baseline. But smart operations use the removal form to strengthen accountability and traceability.
Prevents Unauthorized Restart Imagine a maintenance team finishing a motor repair. One technician removes their lock, assuming others are done. But another worker is still inside the guard panel. Without a centralized removal log, there’s no way to confirm everyone is clear.
A removal form forces synchronization. Each authorized employee must verify their lock is removed intentionally and only after group consensus.
Creates an Audit Trail During an OSHA inspection following a near-miss, investigators will ask: - Who applied the lock? - Who removed it? - Was the area inspected beforehand?
A completed removal form answers these instantly. Without it, teams rely on memory or incomplete notes—risking citations and fines.
Supports Root Cause Analysis
When an incident occurs post-maintenance, the removal form can reveal clues. Was a lock removed early? Was supervision involved? Did someone bypass verification steps? The data helps refine safety protocols.
When Should You Use a Lockout Tagout Removal Form?
Not every lock removal requires a formal form—but most should. Here’s a practical guide:
| Scenario | Use Removal Form? | Why |
|---|---|---|
| Single-employee repair on non-critical equipment | Optional (but recommended) | Simpler task, low risk, but documentation builds good habits |
| Multi-craft work (e.g., electrical + mechanical) | Required | Coordination across teams demands verification |
| Contractor maintenance | Required | External workers may not know internal procedures |
| High-energy systems (hydraulic, pressurized, rotating) | Required | High consequence of error |
| Emergency lock removal | Required (with added justification) | Must explain deviation from standard process |
Even in low-risk cases, consistent use of the form reinforces discipline. Think of it like wearing a seatbelt—even on short trips.
Key Components of an Effective Removal Form
A poorly designed form invites errors. The best ones are clear, enforce workflow logic, and prevent bypassing.
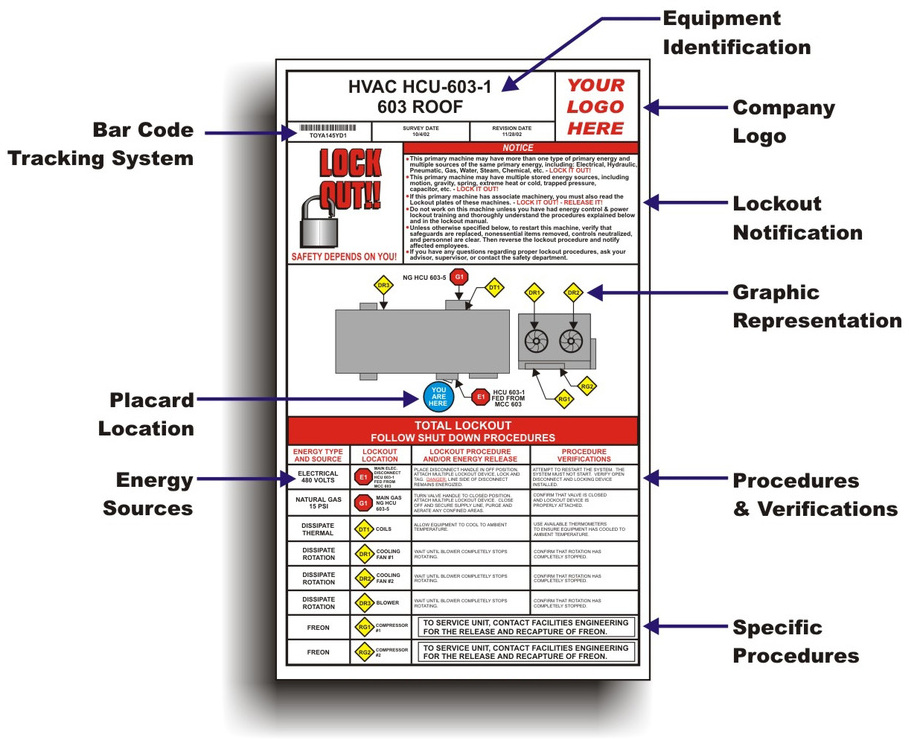
1. Equipment Identification Must include:
- Machine name
- Location (e.g., Production Line B, Station 3)
- Asset or serial number
Example: “Hydraulic Press – Line 2, Asset #HP-205” prevents confusion when multiple similar machines exist.
2. Lock and Tag Inventory List each lock applied, including:
- Owner (name/ID)
- Lock number
- Removal timestamp
This ensures no device is forgotten. Some plants use color-coded locks—red for maintenance, blue for electrical—making visual tracking easier.
3. Clear Safety Verification Checklist Include checkboxes for:
- All tools removed from equipment
- Guards and safety covers reinstalled
- Work area cleared of personnel
- Test run completed (if applicable)
Avoid vague prompts like “Is area safe?” Specifics reduce interpretation errors.
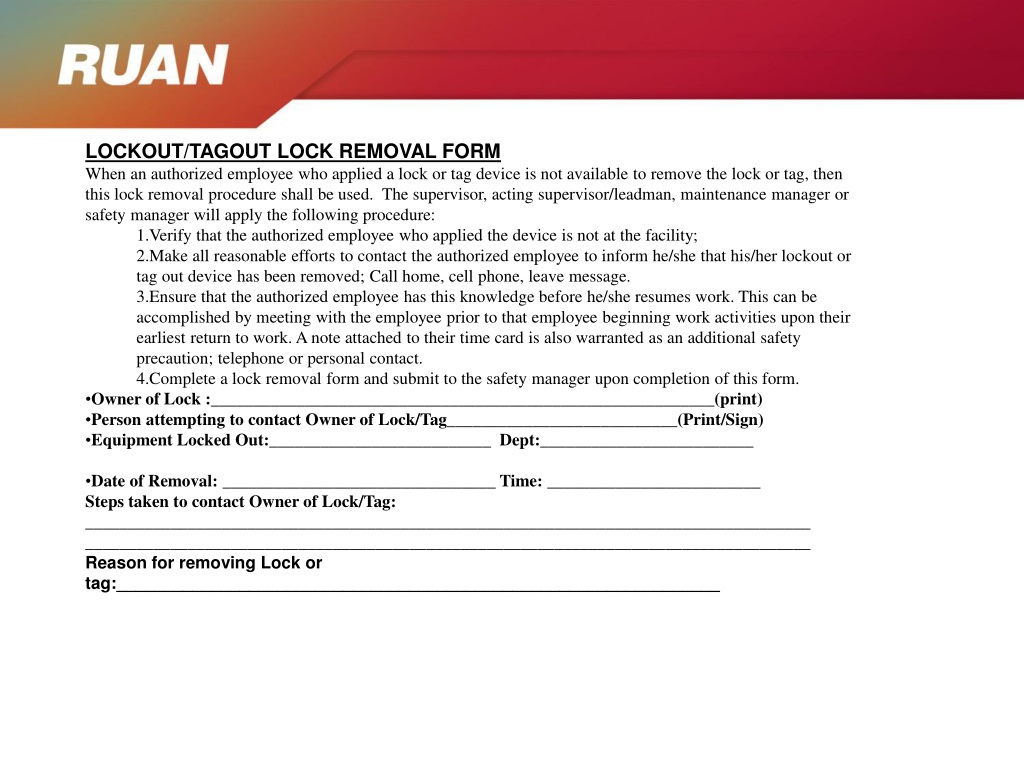
4. Authorized Sign-Off At least one qualified person—often the operations supervisor—must sign. In group lockout scenarios, each individual signs their section, and the primary authorized employee signs off on final clearance.
5. Notes Section for Exceptions Use
this for:
- Early lock removal (e.g., worker reassigned)
- Equipment not restored to normal operation
- Discovered defects post-maintenance
Transparency here prevents future assumptions.
Common Mistakes That Undermine the Process
Even experienced teams make errors. These are the most frequent—and preventable.
Mistake 1: Removing Locks
Before Full Clearance A technician removes their lock after finishing their part, not realizing others are still working. This breaks group LOTO protocol.
Fix: Use a group lockout board with individual locks applied to a central hasp. No removal until all are accounted for.
Mistake 2: Backdating or Faking Signatures Under time pressure, workers “clean up” logs after the fact. This destroys audit integrity.
Fix: Require real-time logging. Use digital forms with timestamps and login authentication.
Mistake 3: Using a Generic Form Across Departments A single form used for both electrical panels and conveyor systems may miss critical checks.
Fix: Customize forms by equipment type or energy source. Hydraulic systems need fluid pressure checks; electrical needs voltage testing.
Mistake 4: Treating Removal as Automatic Some teams assume removal is just the reverse of lockout. But verification steps differ.
Fix: Train on the purpose of removal documentation—not just the steps.
Digital vs. Paper-Based Removal Systems
The shift from paper logs to digital platforms is accelerating. Here’s how they compare:
| Feature | Paper Form | Digital System |
|---|---|---|
| Real-time access | No | Yes (cloud-based) |
| Timestamp accuracy | Manual entry (error-prone) | Automatic |
| Audit readiness | Requires scanning/filing | Instant export |
| Integration with LOTO procedures | Low | High (via CMMS or EHS platforms) |
| Risk of loss or damage | High | Low |
Best practice: Transition to digital when managing 10+ LOTO events weekly. For smaller operations, paper forms with strict filing rules can suffice—but ensure regular reviews.
Digital tools like EHS software or mobile LOTO apps often include built-in removal workflows, photo capture, and approval routing—reducing human error.
Real-World Use Case: Resolving a Failed Restart
At a Midwest food processing plant, a packaging line failed to restart after bearing replacement. The electrician applied power, but the motor tripped immediately.
Review of the lockout removal form revealed: - Locks were removed at 2:15 PM - No test run was checked off - The mechanic noted “coupling alignment uncertain” in the comments
This triggered a root cause review. The coupling had been misaligned, causing binding. Because the note existed, the team avoided blaming the electrician and instead updated alignment verification as a mandatory step on all future removal forms.
Without the form, the issue might have been dismissed as “operator error,” leaving the risk unaddressed.
How to Implement a Removal Form in Your LOTO Program
Start here:
- Audit Current Practice
- Observe 3–5 recent lockout removals. Are verbal confirmations the norm? Is there any documentation?
- Draft a Form Aligned with Your Procedures
- Use OSHA 1910.147 Appendix A as a baseline. Customize for your equipment.
- Pilot With One Department
- Test the form in maintenance or production. Gather feedback on clarity and workflow fit.
- Train on Purpose, Not Just Procedure
- Explain why the form matters—use real near-miss stories if possible.
- Integrate With Existing Systems
- Attach the form to work orders, CMMS logs, or safety audits.
- Review Monthly
- Sample 10% of completed forms for completeness. Track trends like missing signatures or skipped checks.
Final Thoughts: Make Removal as Rigorous as Lockout
The lockout tagout removal form isn’t bureaucracy. It’s the final safeguard in a process designed to protect people.
Too often, teams treat removal as an afterthought—rushing to restart production. But that’s when complacency sets in. A structured, documented removal process ensures that every LOTO cycle ends as safely as it began.
Create your form. Train your team. Audit it monthly. Make it non-negotiable.
Because when the power comes back on, the only thing that should restart is the machine—not the investigation.
What is the purpose of a lockout tagout removal form? It documents the safe and authorized removal of lockout devices, confirming that maintenance is complete, the area is clear, and equipment can be re-energized.
Who should sign the removal form? Each authorized employee who applied a lock should confirm removal. A supervisor or lead often provides final authorization, especially in group lockout scenarios.
Is a removal form required by OSHA? OSHA doesn’t specify a “form,” but 29 CFR 1910.147 requires documented procedures for removing lockout devices. A removal form satisfies this requirement.
Can digital forms be used for LOTO removal? Yes. Digital forms with timestamps, user authentication, and audit logs are increasingly common and often improve compliance and traceability.
What happens if a lock is removed without documentation? It creates a compliance gap, increases risk of accidental startup, and may lead to OSHA citations during inspections or after incidents.
Should contractors use the same removal form? Yes. Contractors must follow site-specific LOTO procedures. Their lock removal should be documented on the same form used by internal teams.
How long should completed removal forms be kept? At minimum, one year—aligned with OSHA recordkeeping expectations for safety documentation. Some industries retain them for 3–5 years.
FAQ
What should you look for in Lockout Tagout Removal Form: A Complete Compliance Guide? Focus on relevance, practical value, and how well the solution matches real user intent.
Is Lockout Tagout Removal Form: A Complete Compliance Guide suitable for beginners? That depends on the workflow, but a clear step-by-step approach usually makes it easier to start.
How do you compare options around Lockout Tagout Removal Form: A Complete Compliance Guide? Compare features, trust signals, limitations, pricing, and ease of implementation.
What mistakes should you avoid? Avoid generic choices, weak validation, and decisions based only on marketing claims.
What is the next best step? Shortlist the most relevant options, validate them quickly, and refine from real-world results.